
And yet I post a photo of me easing lower back pain on someone else?
You know how after a Myotherapy treatment you feel soft, supple and limber?
And then life gets in the way and that tension starts to slowly creep back in again?
Well here are 4 things that you can do in between appointments to help keep you feeling stretched, soft and supple, just like a Leopard ☺
1. HEAT
Heat is one of the easiest yet most effective ways to keep your muscle soft and supple. It’s something I continuously recommend to my clients not only to keep the muscle nice and elastic but to help ease the post-treatment tenderness.
WHAT TO DO
Grab a heat pack or hot water bottle and pop it on your stiff or painful spot. Or jump into a hot bath or shower for a good 10 minutes.
All of these processes do the same thing: dilate the blood vessels close to the surface of the skin and increase blood-flow.
This will speed up circulation over your stiff or painful muscle accommodating the healing process by helping to flush out old cellular waste.
The heat will also help change the state of your fascia (the connective tissue in and around every muscle) going from hard and dense to soft and malleable.
This is why we get super bendy in Bikram yoga.
The heat wilts your connective tissue system like a soft cheese and you suddenly find yourself more limber. This is why we are less stiff in the afternoon opposed to the morning, our bodies have generated heat through movement and the tension of the connective tissue has stretched and eased as a result.
2. MASSAGE BALL or QL CLAW - LOWER BACK
If I could get my clients to do ONE thing it would be to do some self massage weekly.
Firstly, the massage tool needs to be quite firm, you don't want one that's going to collapse under pressure. A lacrosse ball is an ideal size and density for small places. A tennis ball is too soft but a golf ball can be a bit too painful (apart from when using it on the feet).
Another excellent tool that targets the QL muscle specifically (a muscle in the lower back that often gets stiff) is the QL Claw. You can purchase one HERE.
A friend of mine who suffered from chronic lower back pain designed it after curing his pain by using self massage and strengthening.
What is great about the QL Claw is it’s flat base, it means it stays in the same place as you move your body around it. This means you can target trigger points (tender spots that refer pain) in the muscle without slipping off them.
Don’t underestimate self treatment tools, they are SO effective. I have resolved many of my injuries just by rolling around on a massage ball or the QL Claw for 5 minutes.
It’s no different to using direct pressure with my thumb or my elbow in a client’s tissue.
But you don’t have to be a qualified therapist to know where to go, you’ll know.
Trust yourself and your inbuilt ability to discern what feels therapeutic compared to what feels damaging.
It’s not rocket science. It’s that spot that hurts but feels kind of good to camp down on.
It's all about depth and time.
Depth meaning, the indentation you make into your muscle. And the time is crucial to coaxing that trigger point (knot / painful spot) to release.
Resting on your tender spot for 30 seconds to 2 minutes before moving is a good rule to stick to.
WHAT TO DO
While lying on your back with your knees bent and feet firmly planted on the floor, roll your massage ball into the small of your back.
Lift your hips off the ground slightly so you can roll the ball around in the tissue by rocking your pelvis from side to side (rather than the ball).
Make sure to keep enough pressure on the ball so you still get an effective release.
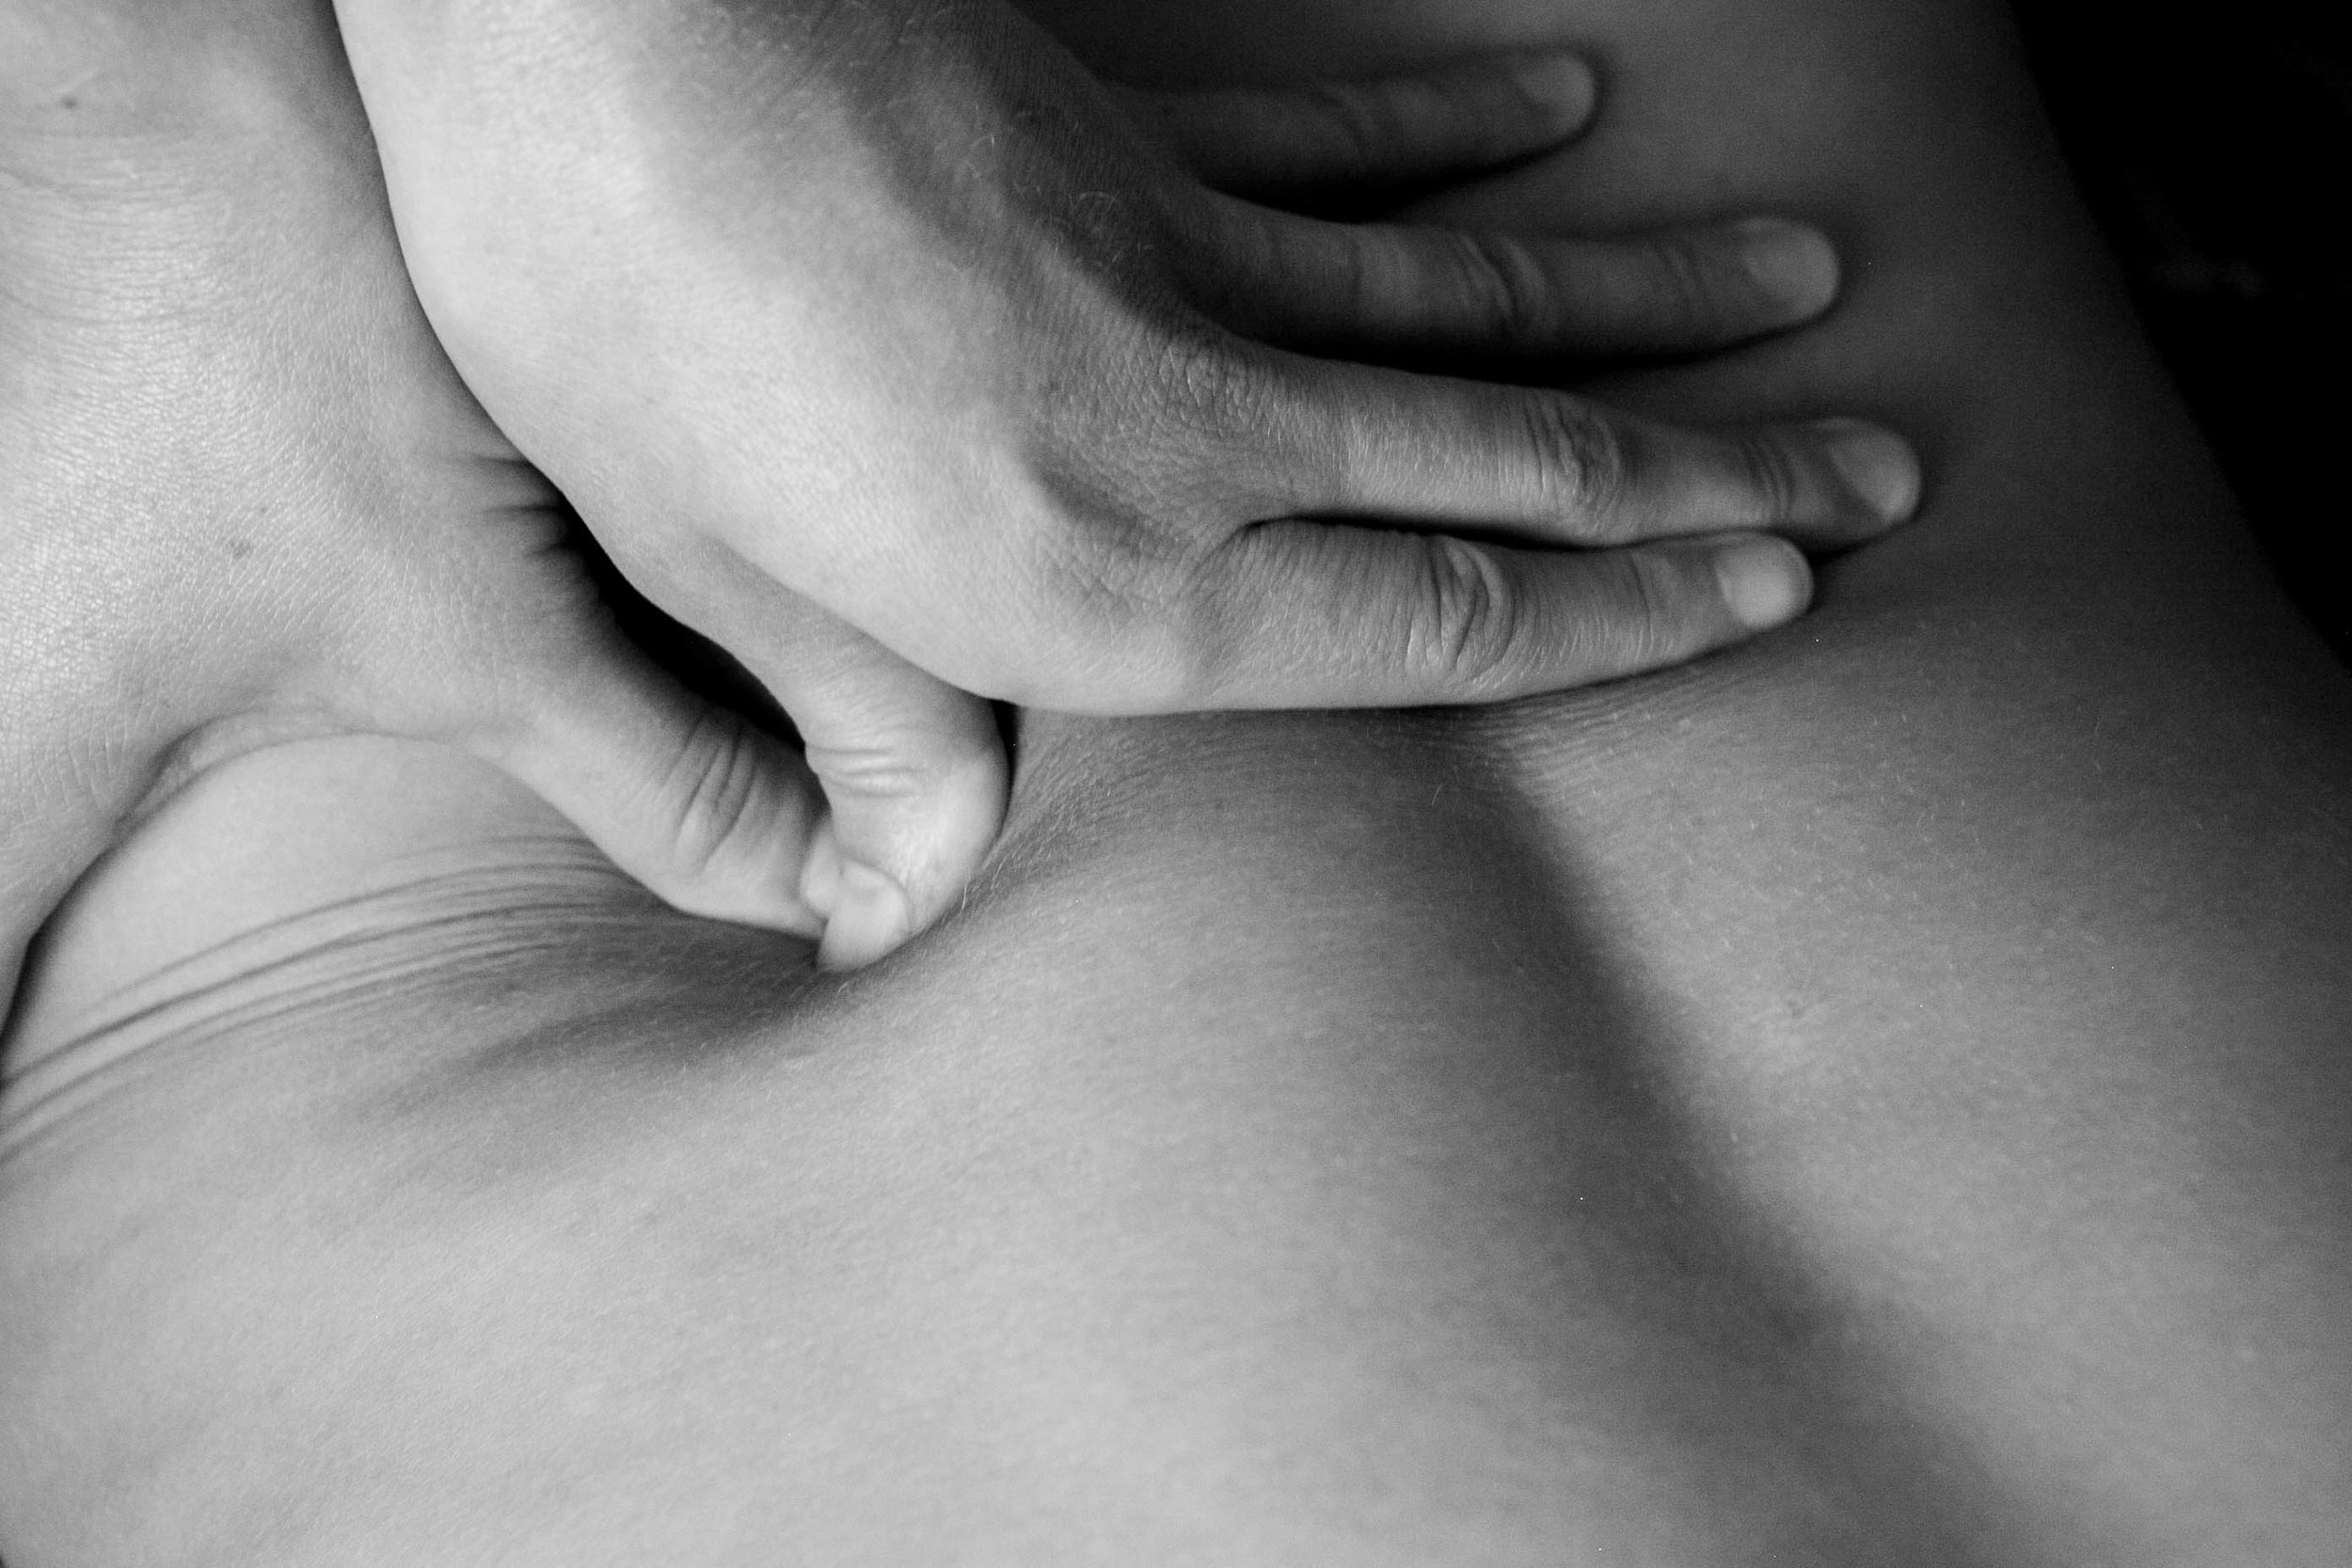
Start by working the tissue from the T-intersection made by your sacrum (bone at the base of your spine) and the top of the hip.
Roll the ball in a line all the way out to the side of your back and then up towards your head. You’ll know when to stop going up because you’ll hit your 12th rib which will just feel uncomfortable.
Don’t worry, you won’t do any damage, just roll the ball back down to where the fleshy part of the muscle is, camping out on spots that feel sore or refer pain elsewhere.
Working the lacrosse ball through the tissue of my lower back
* You don’t have to dissolve the pain completely when you find a painful trigger point; you just have to reduce it.
The point is to change its state from very painful to less painful while using the massage ball. The tissue will go from hard & thickened to a more stretched and gel-like state.
It’ll continue to unravel in the next few days if you do some exercise, continue to hit it with heat, more massage ball treatment and even a little self massage.
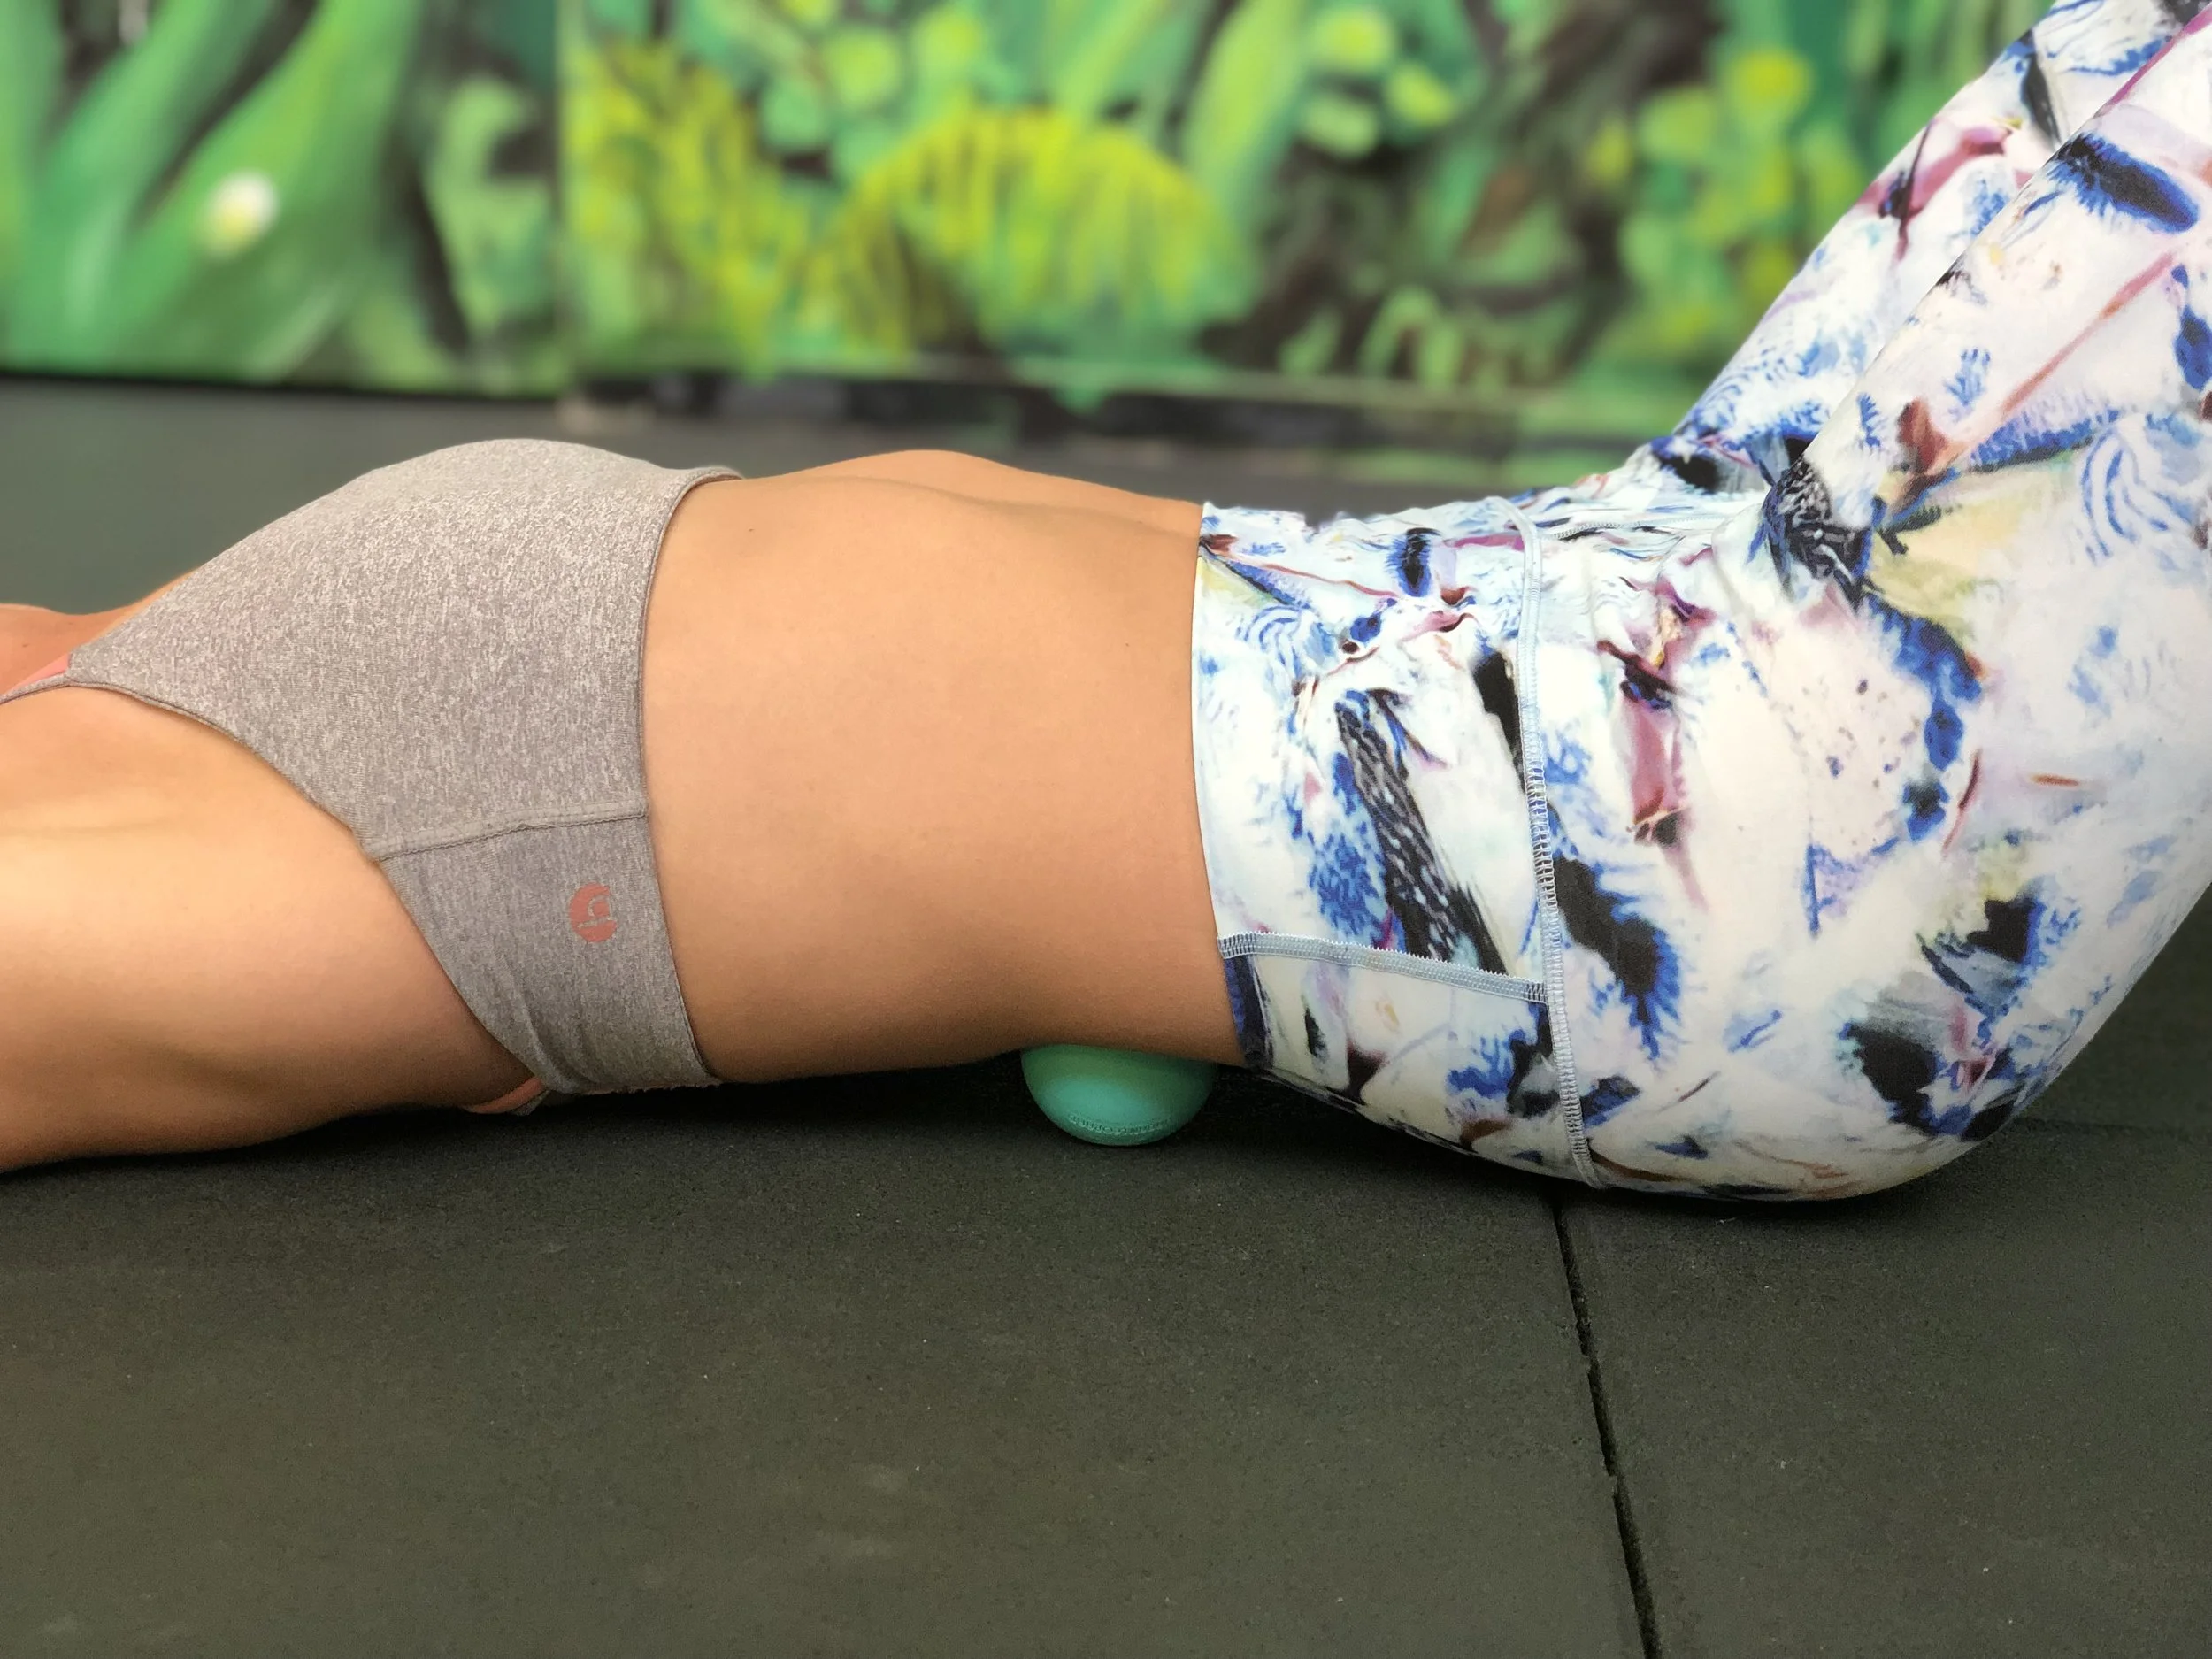
3. MASSAGE BALL - GLUTES / HIPS
Trade Secret!
Loosening up the glutes / hips is a bit of a bit of a game changer in helping to release a lot of other areas in the body as it’ll help put your pelvis in a more neutral alignment.
That means it’ll take tension out of the lower back, upper back and hamstrings.
It’ll take loading out of your quadriceps.
And it’ll help stabilise the hip, knee and ankle.
How’s that? Well, tight muscles can’t be effective or efficient muscles. And part of the job description of the glutes is to help stabilse the hip, knee and ankle.
Try this out, contract your bicep as hard as possible, then try and pick up a pen while keeping it tense.
You look ridiculous right? In order to do the movement well you need your bicep to be able to lengthen and contract.
That’s exactly the same principle with the muscles in the hip. Although it’s not as obvious as the bicep, the principle is the same. Tight muscles do a crappy job when it comes to movement.
WHAT TO DO
To release your glutes, lie down on your side on the ground and roll a massage ball under the fleshy part of your hip (gluteus medius & gluteus minimus muscles). Find a trigger point (sore spot) and try and relax into it by allowing the ball to sink in.
Remember: releasing a trigger point requires time and pressure. So sit the ball in on that spot for about 30 seconds – 2 minutes. Wait for the pain to dissipate before moving on to the next trigger point.
Repeat this process and slowly roll the massage ball over the fleshy hip muscles - camping out over any spots that are tender - to release and lengthen the whole muscle.
Check out the image below to get the positioning right.

4. FOAM ROLLING
After you’ve used a heat pack and a massage ball it’s time to open up the MID BACK by using a foam roller.
If you don’t have a foam roller just roll up a beach towel firmly and then gaffa tape it in place. Just like Macgyver would if he needed to foam roll but didn’t have one.
WHAT TO DO
Lie down on your back with bent knees and feet firmly planted on the floor.
Put the foam roller / towel perpendicular to your spine (make a T-intersection). Place it at bra strap level (gentlemen, use your imagination).
With your hands behind your head slowly lean back over the foam roller, aim to touch the back of your head on the floor.
And breathe.
Nice deep breaths in and out.
Once you’ve been in that spot for 30 seconds, do a small sit up to come off the foam roller, roll it up one spinal segment (about 2 cms) and then lean back over the foam roller again. And breathe.
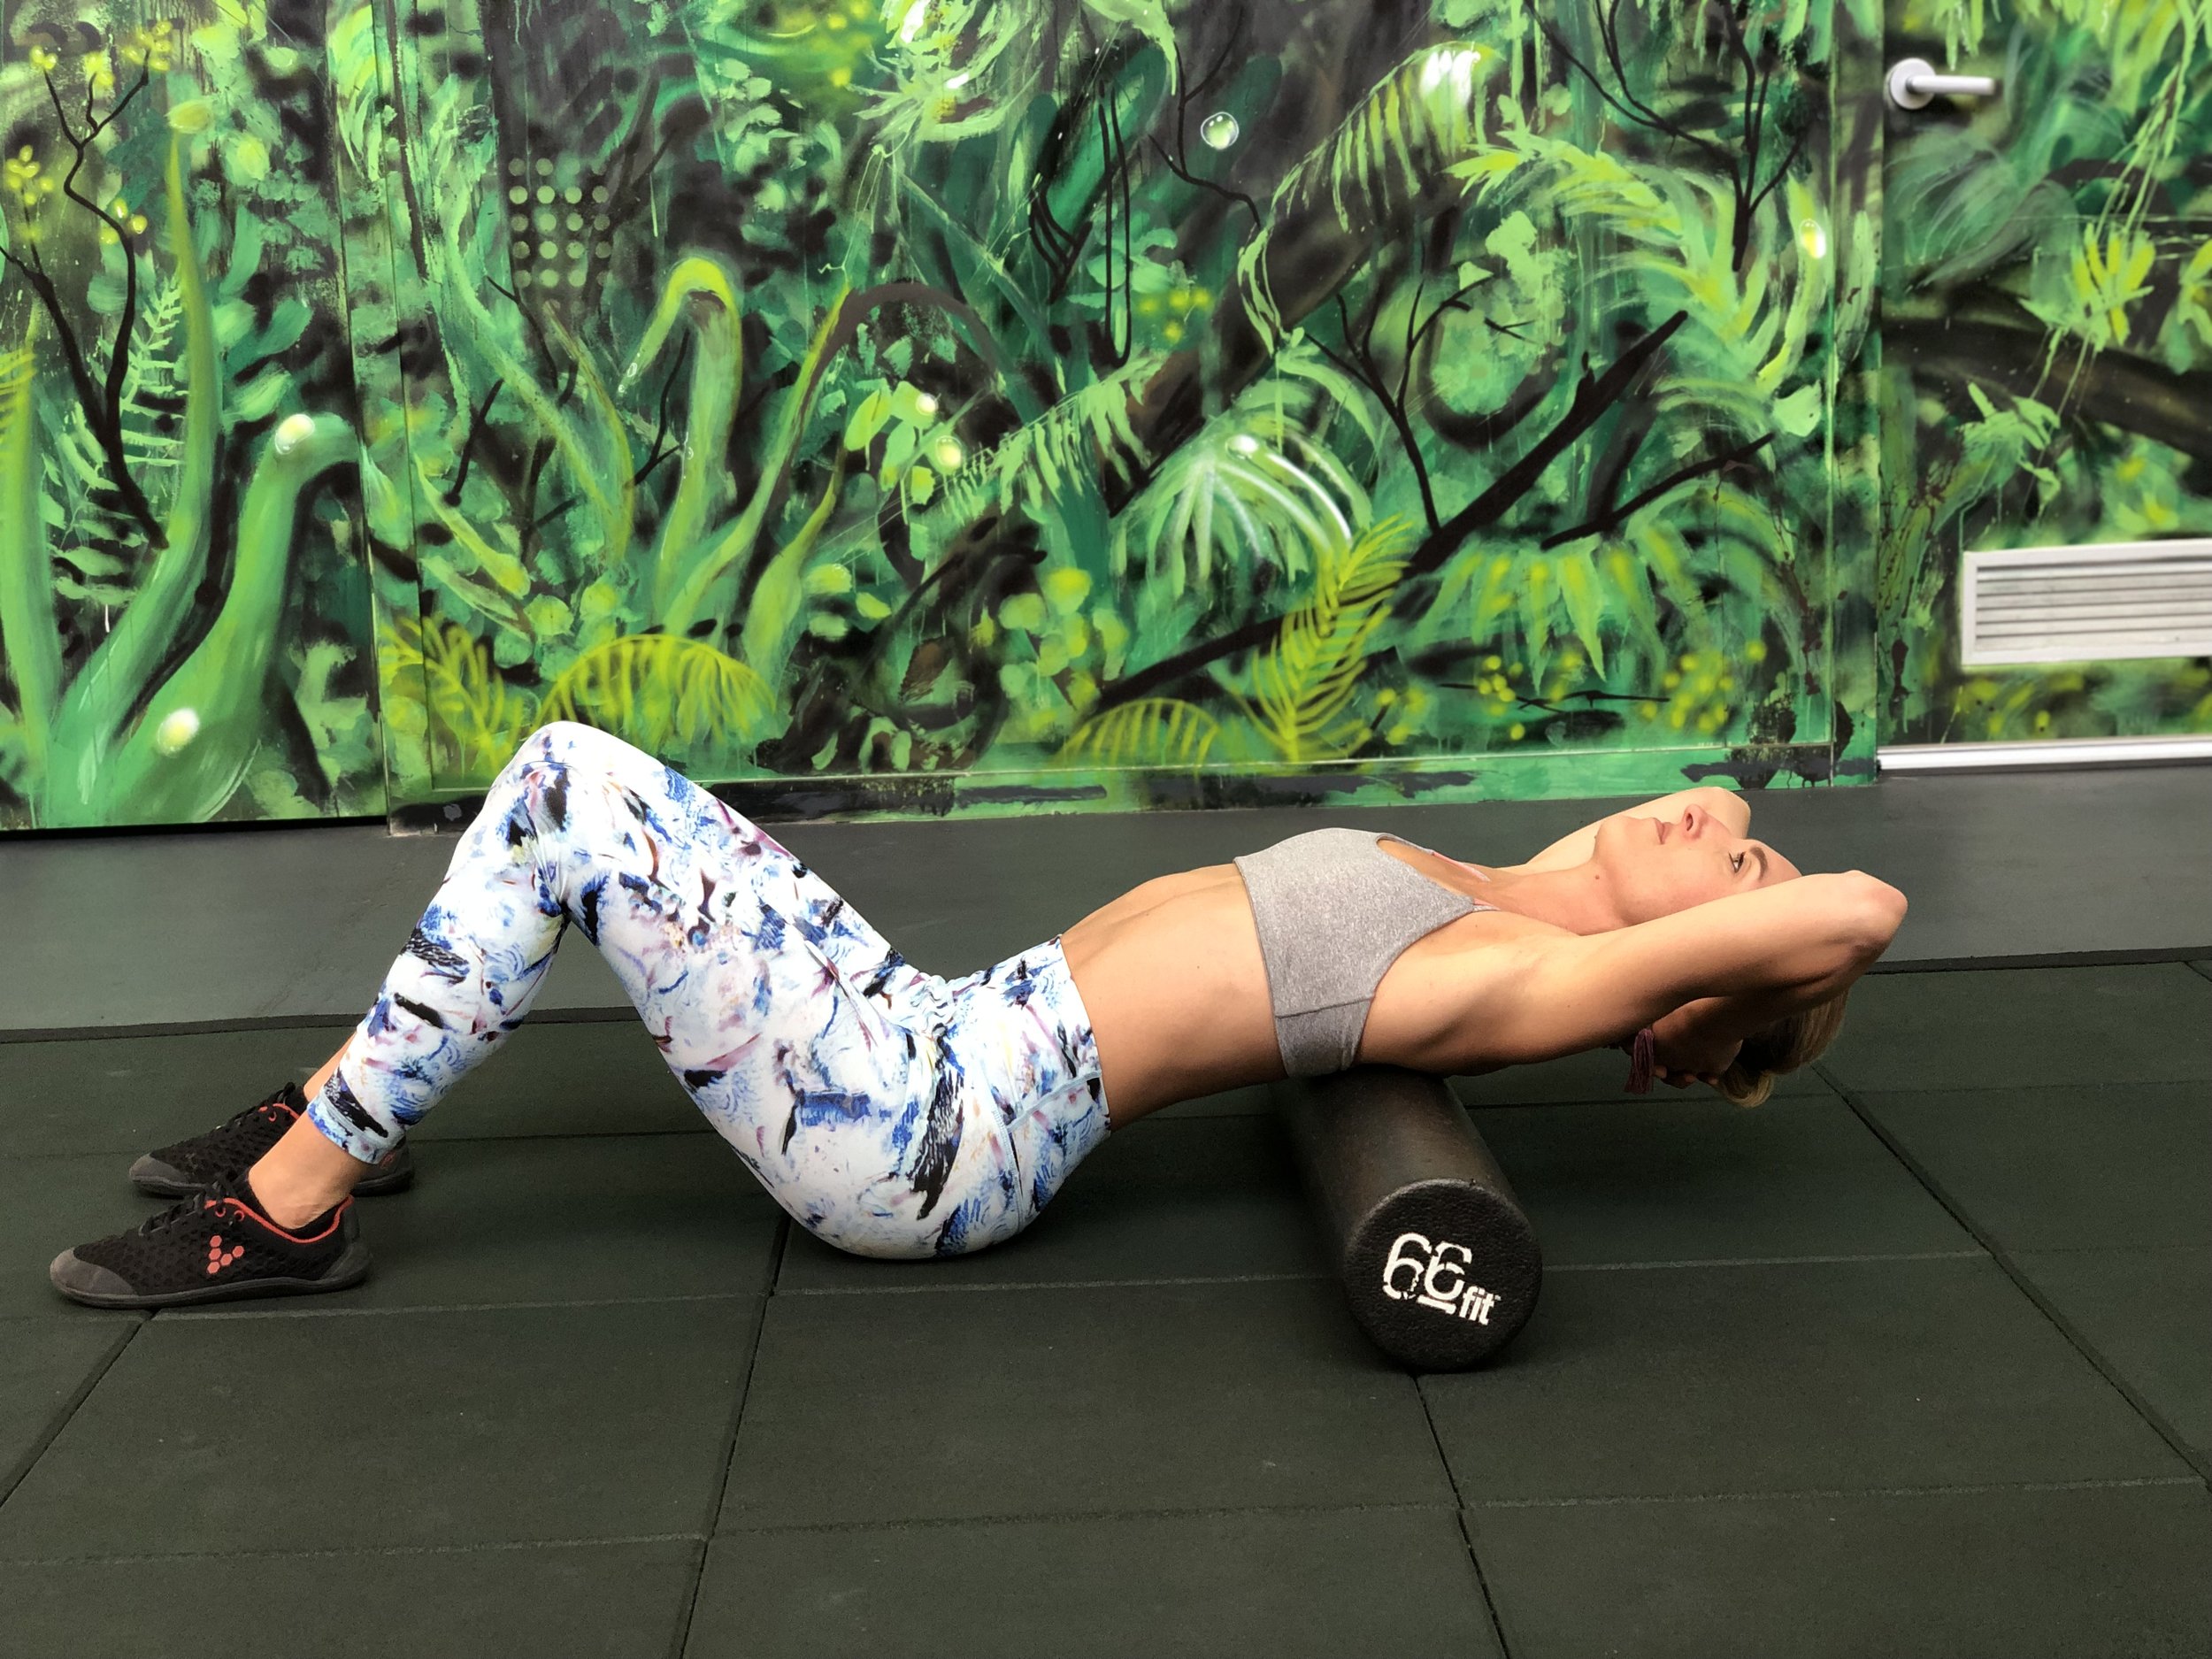
Butt stays on the ground and let your elbows drop out to the side, you’ll get an extra stretch through your lats. This is the first mid back extension of the day after spending a few hours at the computer writing this blog so you can see I’m pretty tight (my back doesn’t want to curve over the roller). But after a few reps this will improve.
The aim is to put your mid back spine into extension (back bend). It’s a position that it rarely gets into because we have arms that like to do things in front of us rather than behind us.
As a result, our spine gets pulled into forward flexion often and gets very stiff.
Apart from getting more mobility in the mid spine, foam rolling this area also opens up your chest.
Suddenly you can take a big, open breath more easily than before.
This immediately sends a message to your parasympathetic nervous system (the system responsible for slowing the heart rate, increasing intestinal and glandular activity and relaxing muscles) telling your body that all is safe and well in the world and that we can relax.
Simple tools. Big outcomes.
SUMMARY
I’ve just given you a lot of information so let me summarise using these tools with an example.
It’s been a few weeks since you’ve had a treatment on your lower back and it feels stiff.
So you grab a heat pack and rest it in your lower back for 10 minutes.
Now you get your massage ball and start to soften up the tissue by rolling it around in the small of your back. Side to side, up and down.
Then you lie on your side with the massage ball to release the glutes / hips because you’re smart and know that releasing the glutes will help take tension out of your lower back.
Finally, you foam roll your mid back because you know if your shoulders are back and open, you’ll put less strain on your lower back.
Suddenly after 20 minutes you’re feeling stretched out, soft and supple.
What’s even better than that is that you’ve proven to yourself that you know how to take your pain away and help bring your body back into balance.
Yeah you!
I hope you’ve found these 4 tips helpful.
Please feel free to pass them onto a friend or family member who may suffer from lower back pain.
Remember: you’re the boss of your body and there is a heap that you can do to solve your own muscular aches and pains.
It just takes a bit of experimentation to learn how.
Feel free to ask me any questions in the comments below.
Take care of your muscles,
Moyan